I’m going to build on Jamie Zawinski’s excellent advice about backups, which you should read first. This is basically that, but with some extra bits. If this seems too complex, then just do what he says.
The plan is to use Backupninja to backup everything to an external USB drive – and also to Amazon S3 or Dropbox, depending on what it is. Backupninja provides a centralized way to configure and schedule many different backup utilities, just by dropping a few simple configuration files into /etc/backup.d/.
I have a multiple hard disk setup for my desktop Linux box - my /home folders live on one disk and / lives on another one. I don’t want to backup everything from the system disk - I can re-install it in 10 mins, and I don’t really want to complicate this by backing up non-essential stuff. I just want to backup a few system wide configuration items from / - and my MySQL databases, which are kept on there.
To do this, I’m going to tell backupninja to backup the system config, MySQL databases and anything else I want backed up, to my /home folder, then backup the whole /home folder.
I’m also going to do extra backups to Amazon S3, so we’ll have some extra cloud backups of critical stuff.
I’m going to use etckeeper to store the system wide config from /etc in a git repository - this way I get a history of changes and the ability to roll back config changes. I’m then just going to backup that git repository.
Making sure your USB disk is mounted at backup time
If you just plug in a USB drive, it will generally auto-mount and appear inside /media. This is often good enough, but if your machine isn’t setup to do this, or it doesn’t work properly for some reason, you will need to mount the drive permanently by editing /etc/fstab.
I suggest that you mount the backup drive via it’s label, as the device name can change for external devices depending on what’s plugged in at the time. To have an external USB drive called ‘backups’ and formatted as ext4, mounted at /mnt/backups, first do the following:
$ sudo mkdir /mnt/backupsthen add something like this to your /etc/fstab file:
# <file system>  <mount point>  <fs-type>  <options>                         <dump-freq>  <pass-num>
LABEL=backups    /mnt/backups   ext4       nodev,nosuid,noatime,nodiratime   0            0
you can test this by running:
$ sudo mount -aIf this works, it shouldn’t print out any errors and browsing to /mnt/backups should show you the contents of your external drive.
In the steps below, I’m going to use /mnt/backups as the backup location, but change this to point to the right place for your local setup.
Backing up System Configuration using etckeeper
Basically, etckeeper runs itself - you just have to install it and switch it on. You can commit changes to /etc manually if you want to, but by default it hooks into apt to commit changes when you install things and has a cron job to backup outstanding changes daily:
etckeeper allows the contents of
/etcbe easily stored in Version Control System (VCS) repository. It hooks into apt to automatically commit changes to/etcwhen packages are installed or upgraded. Placing/etcunder version control is considered an industry best practice, and the goal of etckeeper is to make this process as painless as possible.
To install etckeeper, run this in a console:
$ sudo apt-get install git etckeeperThe etckeeper from the Ubuntu repositories is setup to use bzr by default, because they’re idiots, so lets change it to use git. Edit the /etc/etckeeper/etckeeper.conf file like so:
# The VCS to use.
#VCS="hg"
VCS="git"
#VCS="bzr"
#VCS="darcs"
If you have bzr installed for some reason, then the etckeeper bzr repository will be automatically initialized. To undo that, run this:
$ sudo etckeeper uninitThen to re-initialize with a git repository:
$ sudo etckeeper initIf you don’t have bzr installed it will fail to initialize the bzr repo, so you can just run the second one.
One thing to know about running etckeeper is that it keeps its git repo inside /etc (which is fine) - but this means it runs as root - which takes a bit of getting used to if you’re going to use it manually. You will also need to setup at least a minimal git config for the root user:
$ sudo su -
$ git config --global user.name "Your Name"
$ git config --global user.email duncan.lock@gmail.com
$ exit
Once you’ve done that you can check everything in:
$ cd /etc
$ sudo git status
$ sudo etckeeper commit "Initial Commit"
Setting up backupninja & postfix
The Ubuntu package for backupninja also installs[1] postfix - which it can use to send notification emails. Postfix is a fully capable - but very lightweight - MTA/email server. I’m just going to configure it to send outgoing emails and nothing else. This will allow backupninja to send me emails when backups succeed - or fail.
Install backupninja like this:
$ sudo apt-get install backupninjaConfigure Postfix
During install you will see the postfix install wizard, which will prompt you for some configuration values. You can accept the defaults for everything, except these:
- For ‘type of mail configuration’ select ‘Satellite system’.
- For ‘system mail name’, either accept the default, or enter the domain name to use in the from: address for outgoing emails.
- For ‘relay host’, make sure it’s blank.
That should be all the configuration postfix requires. Once the install has completed, you can test it by running this at the command line:
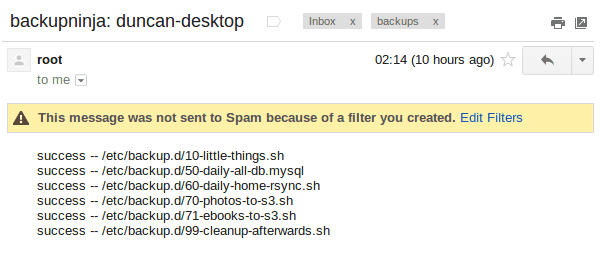
$ echo 'test email body' | mail -s 'test email subject line' send.to.address@wherever.netYou should receive an email at send.to.address@wherever.net - remember to check your spam/junk folder. Waking up to an email like this is very reassuring:
Configure Backupninja
The backupninja install will create a config folder: /etc/backup.d where we’ll be storing our backup jobs - and a config file /etc/backupninja.conf which we’ll configure like this - everything else can stay at its defaults:
reportdirectory = /home/duncan/Dropbox/backups
when = everyday at 02:00
reportemail = your.email@example.net
I’m sending the backup report log to Dropbox & email - and kicking everything off at 2am.
The backupninja config files are extremely well commented, explaining what everything does in great detail. The best way to learn how to configure it is just to read the config files. It also installs some thoroughly commented example backup jobs - one of each type - into /usr/share/doc/backupninja/examples/ which you can use as the basis for your backup jobs.
Now we’ll setup each of the backup jobs we want to run, by adding a simple text file to the /etc/backup.d folder for each job. These are executed in alphanumeric order, so I suggest you create them like this:
The only caveat is that Backupninja config files need to be owned by root and not world or group readable, so make sure they’re: -rw-------, by doing this:
$ sudo find /etc/backup.d/ -type f -exec chmod 600 {} \;and this, to check it worked:
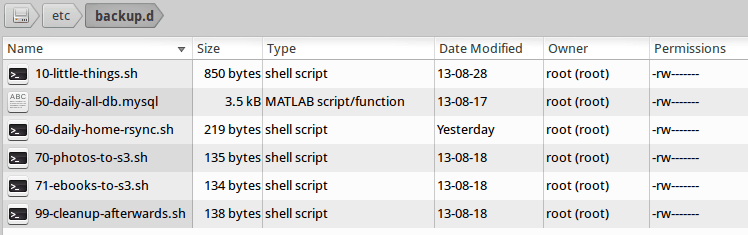
$ sudo ls -lah /etc/backup.d/

total 40K
drwxrwx---   2 root root 4.0K May 19 16:54 .
drwxr-xr-x 154 root root  12K May 19 15:25 ..
-rw-------   1 root root 1.4K May 19 16:54 10-little-things.sh
-rw-------   1 root root 3.5K May 19 16:54 50-daily-all-db.mysql
-rw-------   1 root root  219 May 19 16:54 60-daily-home-rsync.sh
-rw-------   1 root root  135 May 19 16:54 70-photos-to-s3.sh
-rw-------   1 root root  134 May 19 16:54 71-ebooks-to-s3.sh
-rw-------   1 root root  138 May 19 16:54 99-cleanup-afterwards.sh
Speaking of which, backupninja also runs as root, so any files it creates during the backup will be owned by root, so my housekeeping scripts fix that up afterwards.
10-little-things.sh
This does some initial housekeeping and copies some little things into the /home folder for later backing up:
# Backup installed packages list
dpkg --get-selections > /home/duncan/backups/dpkg-selections.txt

# Take simple copies of major config files for convenience
cp /etc/hosts /home/duncan/backups/
cp /etc/fstab /home/duncan/backups/
cp /home/duncan/.bashrc /home/duncan/backups/
cp /home/duncan/.bash_aliases /home/duncan/backups/
cp /home/duncan/.inputrc /home/duncan/backups/
cp /home/duncan/.gitconfig /home/duncan/backups/
cp /home/duncan/.filezilla/sitemanager.xml /home/duncan/backups/

# Copy a few things over to dropbox, for extra safety
cp /home/duncan/backups/hosts /home/duncan/Dropbox/backups/
cp /home/duncan/backups/fstab /home/duncan/Dropbox/backups/
cp /home/duncan/.bashrc /home/duncan/Dropbox/backups/
cp /home/duncan/.bash_aliases /home/duncan/Dropbox/backups/
cp /home/duncan/.inputrc /home/duncan/Dropbox/backups/
cp /home/duncan/.gitconfig /home/duncan/Dropbox/backups/
cp /home/duncan/.filezilla/sitemanager.xml /home/duncan/Dropbox/backups/

# Backup etckeeper, plus any other git repo's I've backed up to /home/duncan/backups/git-backups
cd /etc/
git bundle create /home/duncan/backups/git-backups/etc.git-bundle --all
rsync -vaxAX --delete --ignore-errors /home/duncan/backups/git-backups /home/duncan/Dropbox/backups/git-backups

# Change permissions on the backup folders so that I can use them
chown -R duncan /home/duncan/backups/
chown -R duncan /home/duncan/Dropbox/backups/
50-daily-all-db.mysql
This backs up all my MySQL databases into my home folder using mysqldump:
### backupninja mysql config file ###

databases   = all
backupdir   = /home/duncan/backups/mysql
hotcopy     = no
sqldump     = yes
compress    = yes
dbusername  = ******
dbpassword  = ******
This uses backupninja’s built in support for backing up MySQL databases, so you just need a config file, ending in .mysql, telling it what to backup.
60-daily-home-rsync.sh
This is the big one that backs up the /home folders to an external USB disk, provided it’s mounted where it’s supposed to be:
if mountpoint -q /mnt/backups
then
   info "backup drive is mounted, backing up"
   rsync -vaxAX --progress --delete --ignore-errors --exclude '.cache/' --exclude '.local/share/Trash/' /home/ /mnt/backups/
else
   fatal "backup drive is not mounted, quitting"
fi
Backupninja does have support for running rsync backups directly, just like it does for MySQL, but it does time machine style incremental/ hardlink based backups, which wasn’t what I wanted at the moment. I just used this shell script to run rsync - which works fine.
70-photos-to-s3.sh
This one backs up my photo’s to Amazon S3. It requires s3cmd to be installed and configured:
# Backup photos to Amazon S3
s3cmd -vH --progress --guess-mime-type sync /home/duncan/Photos/ s3://dflock-backups/dunc-desktop/photos/
To install and configure s3cmd, do this:
$ sudo apt-get install s3cmd python-magic
$ s3cmd --configure
See here for more info on setting up s3cmd:
You will be asked for the two keys - copy and paste them from your confirmation email or from your Amazon account page.
71-ebooks-to-s3.sh
I also do the same with my eBooks collection:
# Backup ebooks's to Amazon S3
s3cmd -vH --progress --guess-mime-type sync /home/duncan/Books/ s3://dflock-backups/dunc-desktop/books/
99-cleanup-afterwards.sh
This one just does a tiny bit of housekeeping at the end:
# Change permissions on backups so that I can use them
chown -R duncan /home/duncan/backups/
chown -R duncan /home/duncan/Dropbox/backups/
Testing with ninjahelper
Backupninja comes with a great little tool called ninjahelper to test your backup configurations and manually run jobs. When it starts it gives you a list of each of your jobs:
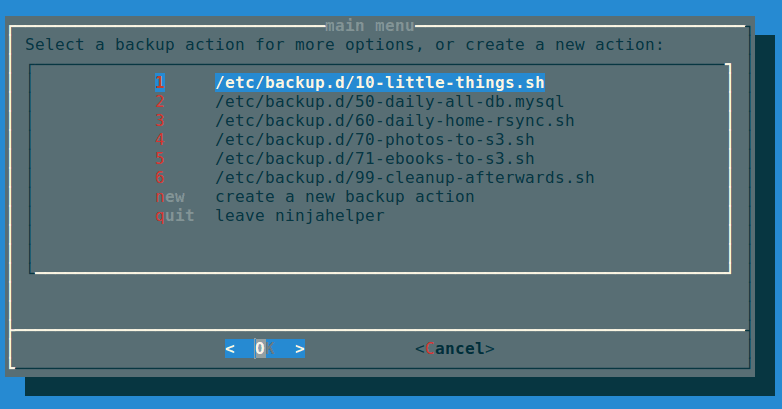
Choose the job you want to test, then you’ll see this:
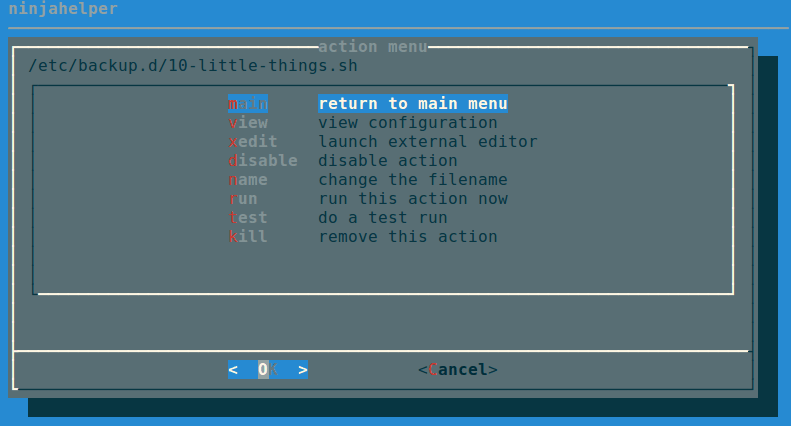
Do a test run, then a real run of each job. This will also test permissions etc… and tell you if anything needs changing.
Use this to do a test run of each of your jobs in turn until they work, then to actually run each one and check the output. Once they all work here, you’re good to go.
You can check your backup system configuration changes into etckeeper now:
$ sudo etckeeper commit "Initial setup of backup system"So, your backup system configuration is now backed up :)
Physical Off-site Backups
I also want physical off-site backups of everything - in case anything happens to my building - like a fire, flood or burglary, for example.
Once you’ve setup the above, this is simplicity itself - just remove the external USB backup disk, stick a post-it note with the date on it, and take it to work, or give it to a friend who lives separately from you.
Then just get a new blank disk and put it where the old one was, format, label and mount it the same way. Backups will then happen to that disk.
Then, like jwz says - every month, bring that other drive back, plug it in and run the backup to it, then either take it away again or swap them over.
Mounting & Unmounting
To un-mount your existing backup disk, so you can safely remove it, do this:
$ sudo umount /mnt/backupsThen remove it and plug the new disk in. Make sure it’s formatted and labeled correctly[2], then mount it like this:
$ sudo mount -aWhich will mount everything in your /etc/fstab that isn’t already mounted.
Testing
I’m deliberately not doing anything too fancy here - no compression, no encryption, etc… - just a simple copy of stuff. This means less things to go wrong - and that testing is easier. Open some files from the backup and check that they’re OK.
Copy some files off the backup disk to check that works; download some stuff from s3.
Do this periodically. Backups that don’t restore are worse than no backups.
Remember to keep an eye on the log file that Backupninja makes at /var/log/backupninja.log - and make sure you’re getting the emails - and check and immediately fix any errors or failures.
Then… relax
Once this is all setup, you can take a deep breath and relax - safe in the knowledge that you’re covered if anything bad happens to your digital life. This only took me a couple of hours to setup from scratch - but will take you much less because you can copy & paste my hard work. What are you waiting for - give yourself the gift of some peace of mind.
Footnotes & References
- The Ubuntu packages install postfix when you install backupninja via a dependency on
+mail-utils+, which depends on+mail-transport-agent+, which is provided by+postfix+. ↩ - i.e. usually the same format as your source drive (ext4 in my case) and labeled ‘backups’. I use the excellent GParted for this, which you can install from your distributions repository in the usual way. ↩