duncan­lock­.net

I run a Miniflux instance on my desktop computer, which fetches all my feeds and makes the content available locally.

Inspired by a discussion the other day on HackerNews, I wrote a little script that asks Miniflux for a list of my feeds in OPML format and turns it into an AsciiDoc page, which I publish on here, as my BlogRoll & Links page:

import os
import sys
import urllib.request
import xml.etree.ElementTree as ET
from datetime import datetime

key = os.environ["MINIFLUX_API_KEY"]

if not key:
    print("$MINIFLUX_API_KEY not set.")
    sys.exit(-1)

url = "http://miniflux.home/v1/export"
hdr = {"X-Auth-Token": key}
request = urllib.request.Request(url, headers=hdr)
opml = ET.fromstring(urllib.request.urlopen(request).read())
updated = datetime.now().astimezone().replace(microsecond=0).isoformat(" ")

header = f"""
:title: Blogroll & Links
:slug: blogroll-links
:created: 2022-11-15 13 …

Continue reading “Automatically Publishing a Blogroll from an OPML File”

cssmin is unmaintained & has a bug with complex :is selectors


Sometimes I want to have a just a tiny bit of CSS that’s unique, just for one page or post. I don’t want a whole stylesheet, or to have to add this to my site-wide theme, just for one post – I want a simple way to add it in the post itself.

This is how I did it:

Continue reading “Custom Per Page CSS With Pelican”

This site has been generated using Pelican 3.3 for over two years - and I finally found some time to upgrade to the current version of Pelican, 3.6.3. This is how I did the upgrade.

I decided to be lazy and do the upgrade in-place, instead of creating a new virtualenv and copying the content & settings over. Luckily, this worked out OK, after a bit of fiddling around.

I also decided, rather cavalierly, to upgrade all the packages in the virtualenv to their latest versions while I was at it. To do this, I upgraded pip, then used pip-review. To upgrade pip & install pip-review system wide, run this on the command line:

$ sudo -H pip install --upgrade pip
$ sudo -H pip install pip-review

Then upgrade eveything in the sites virtualenv:

$ sudo apt-get install libjpeg-dev
$ workon duncanlock.net
$ pip-review …
Continue reading “How I upgraded this website to Pelican 3.6”

A dummy placeholder image, 200x200 pixels square.
Figure 1. This figure has automatic figure numbering.

I had a feature request for automatic figure numbering, like latex. I was revamping this plugin for Pelican 3.3 anyway - and this didn’t seem too hard - so I decided to add it.

So, the Better Figures & Images plugin now supports automatic figure numbering. To enable this for all posts, just add this to your config file:

FIGURE_NUMBERS = True

If you want to enable this per post, just add this to the metadata at the top of the post:

for restructuredText add this:

:figure_numbers: true

and for Markdown add this:

figure_numbers: true
Caution:

Can you have Figures in Markdown?

I use reStructuredText for this site, and I’m not sure if you can even have Figures in Markdown documents - and I haven’t tested it, so caveat emptor …

Continue reading “The Better Figures & Images Pelican plugin now supports Figure Numbering”

There are quite a few changes in Pelican 3.3 - most of them minor, but a few which might mean making some changes to your site in order to upgrade. This is what I did to move my site from Pelican 3.2 to 3.3.

The change that had the biggest impact and took the most work was around image linking - caused by a combination of things. I think I was doing it wrong before and things changed in a way that meant this no longer worked. I also had to update my Better Figures & Images plugin to take this into account.

Previously, I’d been linking to my images like this, both in my theme:

/* Theme CSS Image Link */
background: #2C71B8 url(/static/images/blueprint-background.png) repeat;
{# Theme HTML/Jinja image link #}
<meta name="twitter:image" content …
Continue reading “How I upgraded this website to Pelican 3.3”

Flag of Brazil

I’ve recently been corresponding with Denny Dias, from Brazil, who’s converted his blog over to Pelican - and we’ve been helping each other out a bit with building themes and whatnot.

He’s written up his conversion & theme building process - and was generous enough to credit me after he borrowed some of my theme’s logic, from this blog’s GitHub repo.

As he’s such a nice guy - and as I’ve just borrowed his tagsort jinja filter for my blog’s tag page, I though I’d return the favour - cheers Deny! :)

Continue reading “Obrigado Deny!”

This is a Pelican plugin to calculate various statistics about a post and store them in an article.stats dictionary. You can see this in action in the sidebar on the left of this site.

Nice touch from medium.com - now available in Pelican.

I wanted to implement the nice little “X min read” thing from Medium - and it turned out that it was easy to provide a few other interesting stats at the same time, for people to use in their templates.

The returned article.stats dictionary contains the following:

  • wc: how many words
  • read_mins: how many minutes would it take to read this article, based on 250 wpm
  • word_counts: frequency count of all the words in the article; can be used for tag/word clouds
  • fi: Flesch-kincaid Index/ Reading Ease
  • fk: Flesch-kincaid Grade Level

For example:

{
    'wc': 2760,
    'fi': '65.94',
    'fk': '7.65',
    'word …
Continue reading “Post Statistics Plugin for Pelican”

How Figures & Images work in Pelican, by default

By default Pelican does a great job with figures and images, thanks to built-in support in ReStructuredText [1][1] . Pelican will turn this rst input:

.. figure:: {static}/images/better-figures-images-plugin-for-pelican/dummy-200x200.png
    :align: right

    This is the caption of the figure.

    The legend consists of all elements after the caption. In this case, the legend consists of this paragraph.

into this HTML output:

<div class="figure align-right">
    <img alt="/static/images/dummy-200x200.png" src="/static/images/dummy-200x200.png" />
    <p class="caption">This is the caption of the figure.</p>
    <div class="legend">The legend consists of all elements after the caption. In this case, the legend consists of this paragraph</div>
</div>

Which, given this CSS:

/* Styles for Figures & Images */

img {
    border: 1px solid #bbb;
    border-radius: 3px;
    padding: 4px;
    float: left;
    margin: 1em …
Continue reading “Better Figures & Images Plugin for Pelican”

As I mentioned previously, this site was put together using Pelican - a static site generator, written in Python.

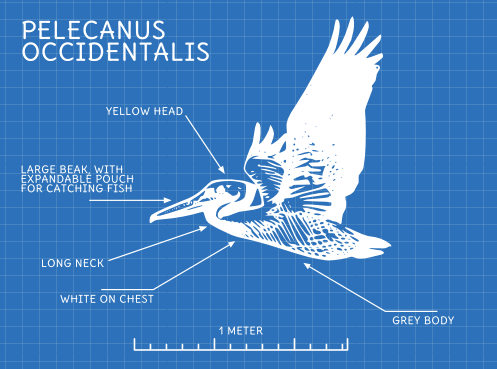
Blueprint style diagram showing a brown Pelican, flying. The diagram point out it's Yellow Head, Large beak and pouch for fishing, long neck, white chest and grey body.
Figure 1. Pelecanus Occidentalis - the Brown Pelican. Original clipart Flying Pelican from OpenClipart, by molumen, Public Domain. More on Pelican, the bird.

Static site generators take your content, pour it into your templates and output the result as static pre-generated HTML, CSS, JS & image files. You can then just upload the resulting folder of output to your server and you’re done. All you need on the server is a web server of some sort, like Apache or Nginx - anything really - all it’s doing is serving static pages.

The huge advantage of this setup is simplicity:

  1. You can write your content in Markdown [1], reStructuredText [2] or AsciiDoc [3] - all simple text formats, designed to facilitate writing and get out of …
Continue reading “How I built this website, using Pelican: Part 1 - Setup”

I’ve been meaning to consolidate my personal websites onto this domain for a long, long time. My original personal website, dflock.co.uk, started in the late nineties - and has been getting a bit long in the tooth of late.

Screenshot of the current version of the dflock.co.uk website homepage
Figure 1. Static text files - the gift that keeps on giving.

That site has been up, looking mostly like that, for ~15 years - with zero maintenance or downtime. Nice to know it’s still valid CSS 1.0 :)

When I created that site originally, the options were either Adobe PageMill, or hand editing HTML in a text editor. I’ve never been a fan of WYSIWYG (what-you-see-is(supposedly)-what-you-get) editors - and the early ones were…​ not good, so I wrote all the HTML code by hand.

That site also has some data heavy pages, which are manually published from …

Continue reading “Welcome to the New Site; same as the Old Site.”